
Introduction
S’mores are an iconic part of summer traditions, evoking memories of gathering around campfires, roasting marshmallows, and sharing laughs with friends and family. With the perfect combination of crunchy graham crackers, rich chocolate, and gooey marshmallows, they have become synonymous with outdoor fun and cozy evenings. However, as beloved as this classic treat is, there’s always room for innovation in the culinary world. Enter the s’mores cookie bars—a delightful reinterpretation of the traditional s’mores that brings all the classic flavors together in a convenient, easy-to-serve format.
S’mores cookie bars combine the beloved elements of s’mores with the chewy, comforting texture of cookie bars, creating a dessert that is not only delicious but also visually appealing. These bars are perfect for parties, picnics, or just a simple family dessert at home. The ease of preparation and the ability to customize the bars make them a go-to recipe for any occasion. Whether you’re a s’mores purist or looking to explore new desserts, these cookie bars are sure to satisfy your cravings.
The Appeal of S’mores Cookie Bars
Nostalgia and Comfort Food
One of the primary appeals of s’mores cookie bars lies in their ability to evoke nostalgia. The flavors of chocolate, marshmallow, and graham crackers transport us back to our childhood, reminding us of summer nights spent around the fire, the sweet aroma of marshmallows toasting, and the thrill of making the perfect s’more. These cookie bars encapsulate that same comforting feeling, making them a wonderful treat to enjoy any time of year, not just during camping season.
Versatility of Cookie Bars
The versatility of cookie bars is another reason they have gained popularity. Unlike traditional cookies that require individual shaping and baking, cookie bars can be prepared in a single pan and cut into squares once cooled. This not only saves time in the kitchen but also allows for easy serving. They can be customized with various mix-ins and toppings, making them suitable for a wide array of occasions—from birthday parties to holiday gatherings. You can add nuts, different types of chocolate, or even seasonal flavors to create a unique twist on the classic recipe.
Family-Friendly Dessert
S’mores cookie bars are a family-friendly dessert that appeals to people of all ages. The ingredients are simple and commonly found in most households, making them an accessible option for home bakers. Children can help in the kitchen, whether it’s measuring ingredients, mixing the batter, or sprinkling the toppings. The final product is a delightful treat that everyone can enjoy, making them a great addition to family gatherings or school events.
Ingredients Breakdown
Before diving into the step-by-step instructions, let’s take a closer look at the key ingredients that come together to create these delicious s’mores cookie bars, and understand the role each plays in the recipe.
Unsalted Butter
The foundation of any great cookie bar is unsalted butter. It not only adds a rich flavor but also contributes to the tender texture of the cookie. Using unsalted butter allows you to control the salt content of the recipe, ensuring a balanced flavor profile.
Sugars (Brown and Granulated)
Both brown and granulated sugars play crucial roles in the recipe. Granulated sugar adds sweetness and structure, while brown sugar, with its higher moisture content, enhances the chewiness of the cookie bars and adds a hint of caramel flavor. The combination of these sugars creates the perfect texture and flavor balance that makes these bars irresistible.
Eggs
Eggs are essential for binding the ingredients together. They provide structure while adding richness to the cookie bars. The proteins in eggs help to create a sturdy yet chewy texture, which is critical for achieving the desired consistency.
Vanilla Extract
Vanilla extract enhances the overall flavor of the cookie bars. It adds depth and complexity, complementing the sweetness of the sugars and the richness of the butter. A splash of vanilla elevates the taste, making the bars even more delicious.
All-Purpose Flour, Baking Soda, and Salt
All-purpose flour is the primary structure-building ingredient in the recipe. It gives the cookie bars their body and holds everything together. Baking soda acts as a leavening agent, helping the bars to rise slightly and become light and fluffy. A pinch of salt is added to balance the sweetness and enhance the flavors of the other ingredients.
Chocolate Chips
Chocolate chips are, of course, a key component of s’mores cookie bars. You can choose between semi-sweet and milk chocolate chips, depending on your personal preference for sweetness. The melted chocolate within the bars adds richness and a delightful gooeyness that is reminiscent of traditional s’mores.
Mini Marshmallows
No s’mores recipe would be complete without marshmallows. Mini marshmallows are used in this recipe to ensure that they melt evenly throughout the bars, providing that signature gooey texture. As they bake, they create pockets of sweetness that contrast beautifully with the chocolate and graham cracker flavors.
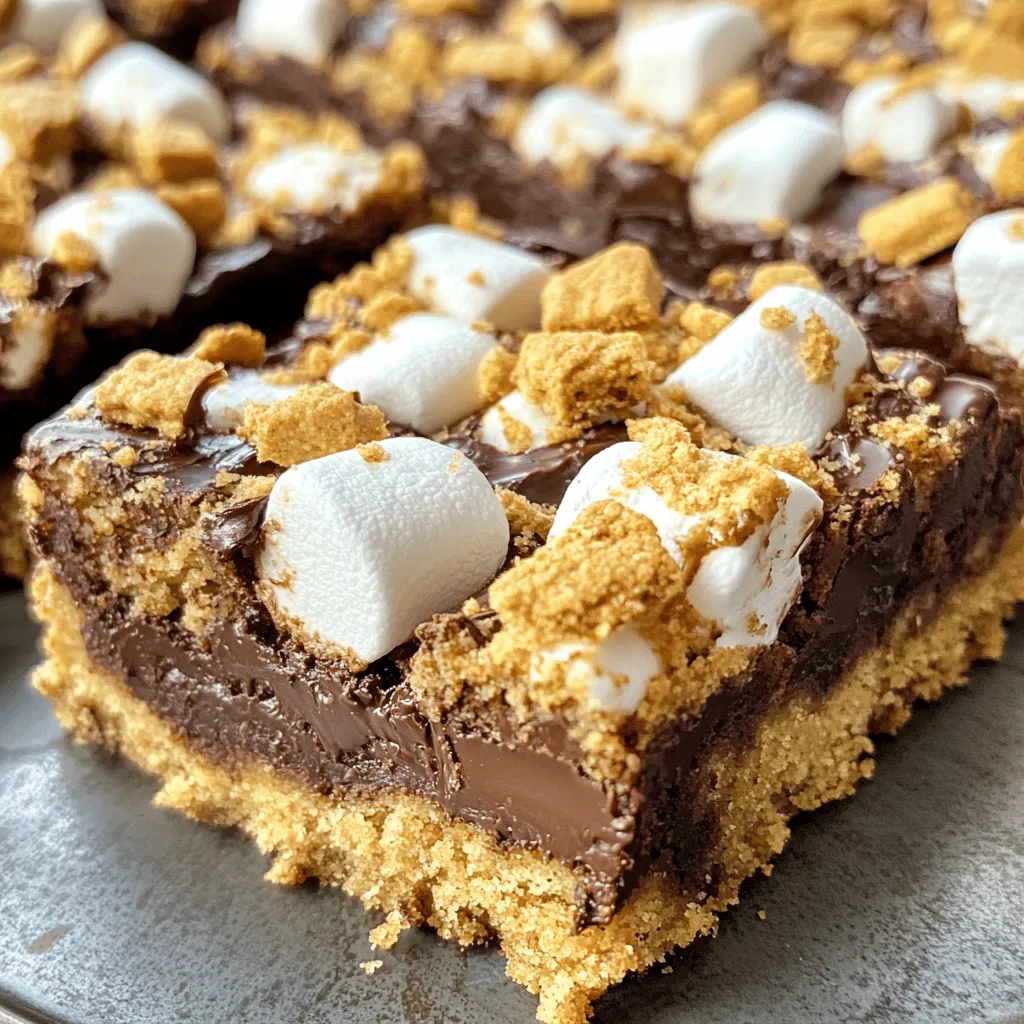
Graham Cracker Crumbs
Graham cracker crumbs are essential for capturing the classic s’mores flavor and texture. They add a hint of crunch and the signature taste that complements the chocolate and marshmallows perfectly. The crust created by the graham cracker crumbs is a key element in achieving the authentic s’mores experience.
Toppings
To enhance the s’mores experience, additional toppings can be added before baking. Crushed graham crackers and chocolate pieces can be sprinkled on top of the bars, creating an attractive layer of texture and flavor. These toppings not only make the bars visually appealing but also add an extra layer of chocolatey goodness.
Step-by-Step Instructions
Now that we’ve covered the ingredients, let’s delve into the step-by-step instructions for creating these delectable s’mores cookie bars. Follow these clear and detailed instructions for the best results.
1. Preheat the Oven: Start by preheating your oven to 350°F (175°C). This ensures that your cookie bars bake evenly and achieve the perfect texture.
2. Prepare Your Baking Dish: Line a 9×13-inch baking dish with parchment paper, allowing some overhang for easy removal later. This step makes it easier to lift out the bars once they are baked and cooled.
3. Cream the Butter and Sugars: In a large mixing bowl, combine the softened unsalted butter, granulated sugar, and brown sugar. Use an electric mixer to cream the mixture together until it becomes light and fluffy. This process typically takes about 2-3 minutes. The goal is to incorporate air into the mixture, which will help the bars rise.
4. Add the Eggs and Vanilla: Beat in the eggs, one at a time, ensuring that each egg is fully incorporated before adding the next. Then, mix in the vanilla extract. This will create a smooth and cohesive batter.
5. Combine the Dry Ingredients: In a separate bowl, whisk together the all-purpose flour, baking soda, and salt. Gradually add the dry ingredients to the wet mixture, mixing on low speed until just combined. Be careful not to overmix, as this can lead to tougher cookie bars.
6. Fold in Chocolate Chips and Marshmallows: Gently fold in the chocolate chips and mini marshmallows using a spatula. Make sure they are evenly distributed throughout the dough for the best flavor in every bite.
7. Add Graham Cracker Crumbs: Next, gently fold in the graham cracker crumbs until they are fully incorporated into the dough. This step is crucial for achieving that classic s’mores flavor.
8. Transfer to Baking Dish: Pour the cookie bar mixture into the prepared baking dish, using a spatula to spread it evenly. Press down gently to ensure it’s packed tightly.
9. Add Toppings: Before placing the dish in the oven, sprinkle additional graham cracker crumbs and chocolate pieces over the top of the cookie bar mixture. This will create a beautiful topping that enhances the s’mores experience.
10. Bake: Place the baking dish in the preheated oven and bake for 25-30 minutes, or until the edges are golden brown and the center is set. Keep an eye on the bars to avoid overbaking, as you want them to remain soft and chewy.
As the s’mores cookie bars bake, your kitchen will fill with the delightful aroma of melted chocolate and toasted marshmallows, creating an anticipation that’s hard to resist.
Stay tuned for the next part, where we will explore tips for achieving the best results with your s’mores cookie bars, as well as address common questions that may arise during the baking process.

Prepping the Baking Pan and Preheating the Oven
Before you embark on your cookie bar creation, it’s essential to prepare your baking pan properly. Start by selecting a 9×13 inch baking dish, which is the ideal size for achieving the perfect thickness for your S’mores Cookie Bars. Grease the pan generously with butter or non-stick cooking spray to prevent sticking, ensuring that you can easily remove the bars once baked. For added security against sticking, you can also line the bottom and sides of the pan with parchment paper, allowing for easy lifting and cutting later.
Next, preheat your oven to 350°F (175°C). Preheating is a crucial step in baking, as it ensures that your cookie bars will bake evenly and rise correctly. While your oven is heating up, you can move on to preparing the dough.
Creaming Butter and Sugars: Tips for Achieving the Perfect Consistency
In a large mixing bowl, begin the process by creaming together one cup of unsalted butter and one cup of granulated sugar, along with a packed cup of brown sugar. Using an electric mixer on medium speed, beat the mixture until it becomes light and fluffy, usually taking about 2 to 3 minutes. This step is vital as it incorporates air into the mixture, resulting in a chewy and soft texture for your cookie bars.
If you don’t have an electric mixer, a sturdy wooden spoon can also work—just be prepared to put in a bit more elbow grease. Make sure to scrape down the sides of the bowl intermittently to ensure all ingredients are well combined. The perfect consistency should be creamy without any visible lumps of butter or sugar.
Incorporating Eggs and Vanilla: Ensuring Even Mixing
Once your butter and sugars are well creamed, it’s time to add in the eggs and vanilla extract. Incorporate two large eggs, one at a time, mixing well after each addition. This gradual incorporation helps maintain the emulsification of the batter, essential for achieving the desired texture.
Next, add in one teaspoon of pure vanilla extract. Vanilla enhances the overall flavor profile of your S’mores Cookie Bars, making them irresistibly delicious. Ensure that the mixture is smooth and homogenous before moving on to the dry ingredients.
Mixing Dry Ingredients: Importance of Combining Thoroughly but Gently
In a separate bowl, whisk together two cups of all-purpose flour, one teaspoon of baking soda, and half a teaspoon of salt. This step is crucial as it ensures that the leavening agent is evenly distributed throughout the flour, preventing any clumps.
Once mixed, gradually add the dry ingredients to the wet mixture. It’s essential to mix the batter gently at this stage. Overmixing can lead to tough cookie bars, as it develops the gluten in the flour. Mix just until the flour is incorporated, and you no longer see dry flour in the bowl.
Folding in Chocolate Chips and Graham Cracker Crumbs: Techniques for Even Distribution
Now it’s time to add the star ingredients: chocolate chips and graham cracker crumbs. Fold in one cup of semi-sweet chocolate chips and one cup of crushed graham crackers using a spatula. This gentle folding technique allows you to maintain the airy texture of the batter while ensuring that the chocolate chips and crumbs are evenly distributed throughout.
You can use store-bought graham cracker crumbs or crush whole graham crackers in a plastic bag with a rolling pin for a more homemade approach. The ratio of chocolate and graham cracker is flexible; feel free to adjust based on your preference for more chocolatey or crunchier bars.
Layering Technique: How to Create the Perfect S’mores Effect
To achieve that iconic S’mores effect, start by spreading half of your cookie dough evenly in the prepared baking pan. Make sure to press it down gently with your hands or a spatula for an even layer. Next, add a layer of chocolate bars—about 4 to 5 bars of milk chocolate will do perfectly—over the dough. This adds that gooey chocolate experience characteristic of a traditional S’more.
After placing the chocolate layer, spread the remaining cookie dough over the top. It’s okay if some of the chocolate is peeking through; it adds to the appeal! For a finishing touch, consider sprinkling additional graham cracker crumbs over the top layer for added texture and flavor.
Baking Time and Testing for Doneness: Indicators for a Successful Bake
Place your pan in the preheated oven and bake for approximately 25-30 minutes. Keep an eye on the edges; they should turn a light golden brown while the center remains soft. To test for doneness, insert a toothpick into the center of the bars; it should come out with a few moist crumbs but not wet batter.
Once baked, remove the pan from the oven and let it cool in the pan for about 10-15 minutes before transferring it to a wire rack for complete cooling. This cooling period is essential as it allows the bars to set properly, making them easier to cut into squares later.
Baking Tips for Perfect S’mores Cookie Bars
Common Pitfalls to Avoid
1. Overmixing: Be cautious during the mixing process, especially after adding the flour. Overmixing leads to tough bars.
2. Underbaking: It can be tempting to take them out early if they look done, but underbaking can result in gooey centers that may not hold together well.
3. Uneven Layering: Ensure that you spread the dough evenly in the pan to prevent uneven baking and texture.
Importance of Allowing the Bars to Cool Before Cutting
Patience is key! Allowing the S’mores Cookie Bars to cool completely in the pan ensures that they set properly, making for clean edges when cut. If you try to cut them while they are still warm, they may crumble or fall apart.
Suggestions for Serving: Warm vs. Room Temperature Enjoyment
These cookie bars are delightful both warm and at room temperature. Serve them warm with a scoop of vanilla ice cream for a decadent dessert, or enjoy them as is for a chewy, satisfying snack. If you want to elevate the experience, drizzle some melted chocolate or caramel sauce on top before serving.
Customization Ideas
Flavor Variations
Feel free to get creative with your S’mores Cookie Bars! Instead of semi-sweet chocolate chips, try using dark chocolate, milk chocolate, or even white chocolate for a different flavor profile. You can also incorporate peanut butter chips or butterscotch chips to add a unique twist.
Seasonal Adaptations
Consider seasonal adaptations to keep your S’mores Cookie Bars exciting throughout the year. For a festive touch, add crushed peppermint candies during the winter holidays or use fall spices like cinnamon and nutmeg for a cozy autumn treat.
Dietary Alternatives
If you or your guests have dietary restrictions, there are ways to modify this recipe. To make gluten-free bars, substitute all-purpose flour with a gluten-free flour blend. For a vegan version, replace the butter with coconut oil or vegan butter, use flax eggs instead of regular eggs, and ensure that your chocolate is dairy-free.
Storage and Shelf Life
To keep your S’mores Cookie Bars fresh, store them in an airtight container at room temperature. They should last for about 3-5 days. If you want to extend their shelf life, consider refrigerating them, where they can last up to a week. Just remember to let them come to room temperature before serving for the best flavor and texture.
Conclusion
Making and enjoying S’mores Cookie Bars is an experience that captures the essence of summer campfire memories in a convenient and delightful form. The combination of rich chocolate, buttery cookie, and the nostalgic taste of graham crackers creates a treat that is sure to please both kids and adults alike.
We encourage you to try this recipe, experiment with your own twists, and share the joy of these delicious bars with friends and family. Whether you’re gathering around a fire or enjoying a quiet evening at home, these S’mores Cookie Bars are bound to bring a smile to your face and warmth to your heart. Enjoy the journey of baking and the delightful results that follow!