
Introduction
As the leaves change color and the air turns crisp, many home bakers and dessert lovers eagerly embrace the arrival of fall. This beautiful season not only brings cozy sweaters and pumpkin spice lattes but also inspires a surge of seasonal treats that warm the heart and satisfy the sweet tooth. Among the most delightful of these treats are Pumpkin Oreo Balls, a delicious confection that perfectly embodies the essence of autumn.
These delectable bites combine the unique flavor of Pumpkin Spice Oreo cookies with the creamy richness of cream cheese, resulting in a dessert that is both indulgent and easy to prepare. With just a few ingredients and simple steps, you can whip up a batch of these Pumpkin Oreo Balls that are sure to impress at gatherings, parties, or even as a personal indulgence during those quiet evenings at home. Their festive appeal, alongside their rich flavors, makes them a must-try as the pumpkin season kicks into high gear.
Understanding the Ingredients
To create the perfect Pumpkin Oreo Balls, it’s essential to understand the role of each ingredient. Each component contributes not only to the flavor but also to the texture and overall experience of these delightful treats.
Pumpkin Spice Oreo Cookies
The star of this recipe is undoubtedly the Pumpkin Spice Oreo cookies. These limited-edition treats capture the essence of fall with their unique flavor profile—an enchanting blend of pumpkin, spices, and the classic chocolate wafer. The seasonal appeal of Pumpkin Spice Oreos makes them a popular choice among those looking to celebrate fall flavors. When crushed, these cookies provide the backbone for the Pumpkin Oreo Balls, contributing to both the taste and texture, ensuring each bite is packed with that beloved pumpkin spice flavor.
Cream Cheese
Cream cheese plays a pivotal role in this recipe, serving as the binding agent that transforms the crushed cookies into a cohesive mixture. Its creamy texture adds a rich mouthfeel and balances the sweetness of the Oreos, preventing the treats from becoming overwhelmingly sweet. Incorporating cream cheese into the mixture not only enhances the overall flavor but also gives the Oreo Balls a delightful, creamy consistency that melts in your mouth. This ingredient is crucial for achieving the perfect balance between sweet and savory in your dessert.
White Chocolate Chips
To elevate the Pumpkin Oreo Balls, they are coated in white chocolate, which adds a layer of richness and a smooth finish. White chocolate complements the flavors of pumpkin and spice beautifully, creating a luxurious coating that enhances each bite. The sweetness of the white chocolate provides a delightful contrast to the spiced filling, making every bite an indulgent experience. Additionally, the melted white chocolate helps to seal in the flavors of the filling, ensuring that the Pumpkin Oreo Balls remain moist and flavorful.
Coconut Oil
While coconut oil is optional in this recipe, it can be a game-changer when it comes to melting the white chocolate. Adding a small amount of coconut oil to the chocolate before melting not only ensures a smoother consistency but also helps the chocolate coat the Oreo balls more evenly. The subtle hint of coconut flavor can also enhance the overall taste profile, complementing the pumpkin and spice notes beautifully. However, if you prefer a classic white chocolate coating, feel free to omit the coconut oil without compromising the recipe.
Pumpkin Pie Spice and Sea Salt
The finishing touches for these treats come from the garnishing ingredients: pumpkin pie spice and a sprinkle of sea salt. Pumpkin pie spice is a blend of warm spices—typically cinnamon, nutmeg, ginger, and allspice—that enhances the flavor of the Pumpkin Oreo Balls, adding an aromatic depth that embodies the spirit of fall. A light dusting of sea salt on top of the chocolate coating can create a harmonious balance between sweet and salty, elevating the overall flavor experience and presenting a sophisticated touch to your seasonal treat.
Step-by-Step Instructions
Creating Pumpkin Oreo Balls is not only enjoyable but also straightforward, making this recipe perfect for bakers of all skill levels. Follow these detailed steps to ensure your treats turn out perfectly every time.
Crushing the Oreos
The first step in making Pumpkin Oreo Balls is to crush the Pumpkin Spice Oreos into fine crumbs. Achieving the right consistency is crucial for the texture of your treats. A food processor is the most effective tool for this task, as it can quickly and efficiently break down the cookies into fine crumbs. Simply place the Oreos in the food processor and pulse until you reach a sandy texture. If you don’t have a food processor, you can also place the cookies in a zip-top bag and crush them with a rolling pin—just be sure to apply even pressure to achieve a consistent crumb size.
Mixing with Cream Cheese
Once you have your Oreo crumbs, the next step is to mix them with cream cheese. In a large mixing bowl, combine the crushed cookies with softened cream cheese. Using a spatula or your hands, mix the ingredients until they are fully incorporated. You’re aiming for a dough-like consistency that holds together well but is still creamy and smooth. If the mixture feels too dry, you can add a bit more cream cheese; if it’s too wet, consider adding a touch more crushed Oreos to balance it out. The goal is to create a mixture that is easy to shape into balls while maintaining a rich, creamy texture.
As you mix, take a moment to enjoy the enticing aroma of pumpkin spice that fills the air. This step is not only about combining the ingredients but also about immersing yourself in the delightful sensory experience that these seasonal treats bring. Once the mixture is well combined, you’ll be ready to shape your Pumpkin Oreo Balls into perfect little bites of fall goodness.
Stay tuned for the next part of this article, where we’ll dive deeper into the remaining steps of creating these delicious Pumpkin Oreo Balls, along with tips for decorating and serving them for your next fall gathering.

Forming the Balls
Once your Pumpkin Oreo mixture is fully combined and has reached a dough-like consistency, it’s time to form the balls. The key to achieving uniformity in size is to use a small cookie scoop or a tablespoon to measure out your portions. A cookie scoop typically holds about 1 tablespoon of dough, making it an ideal tool for this task. Aim for balls that are approximately 1 inch in diameter. This size ensures that they are easy to eat and allows for the chocolate coating to adhere properly.
To roll the balls, take a portion of the dough in your hands and gently roll it between your palms, applying just enough pressure to create a smooth exterior. Avoid overworking the dough, as this can lead to a denser texture. If you find that the mixture is a bit sticky, lightly dust your hands with powdered sugar to help with the rolling process. Once all the balls are formed, place them on a parchment-lined baking sheet and refrigerate for at least 30 minutes. Chilling helps them firm up, which will make the chocolate coating process easier and more successful.
Melting the Chocolate
Melting chocolate for coating your Pumpkin Oreo Balls requires attention to detail to ensure a smooth and creamy consistency without burning. Start by chopping your chocolate into small, uniform pieces. This helps the chocolate melt evenly. You can use either white chocolate or milk chocolate, depending on your preference, but be aware that different chocolates have different melting points.
To melt the chocolate, you have two main options: a microwave or a double boiler. If using the microwave, place the chopped chocolate in a microwave-safe bowl. Heat it in short bursts of 15-30 seconds, stirring after each interval. This method prevents overheating, which can cause the chocolate to seize. If it becomes too thick, you can add a teaspoon of vegetable oil or shortening to help thin it out.
For the double boiler method, fill a saucepan with about an inch of water and bring it to a gentle simmer. Place a heatproof bowl on top, ensuring it doesn’t touch the water. Add your chopped chocolate to the bowl and stir occasionally until melted and smooth. Once fully melted, remove it from heat and let it cool slightly before dipping your Pumpkin Oreo Balls.
Coating the Balls
Coating your Pumpkin Oreo Balls in melted chocolate is where the magic happens. Using a fork or a dipping tool, take a chilled ball and gently lower it into the melted chocolate. Ensure that the ball is completely submerged, then lift it out and allow any excess chocolate to drip off. Be careful not to pierce the ball with the fork, as this can cause it to break apart.
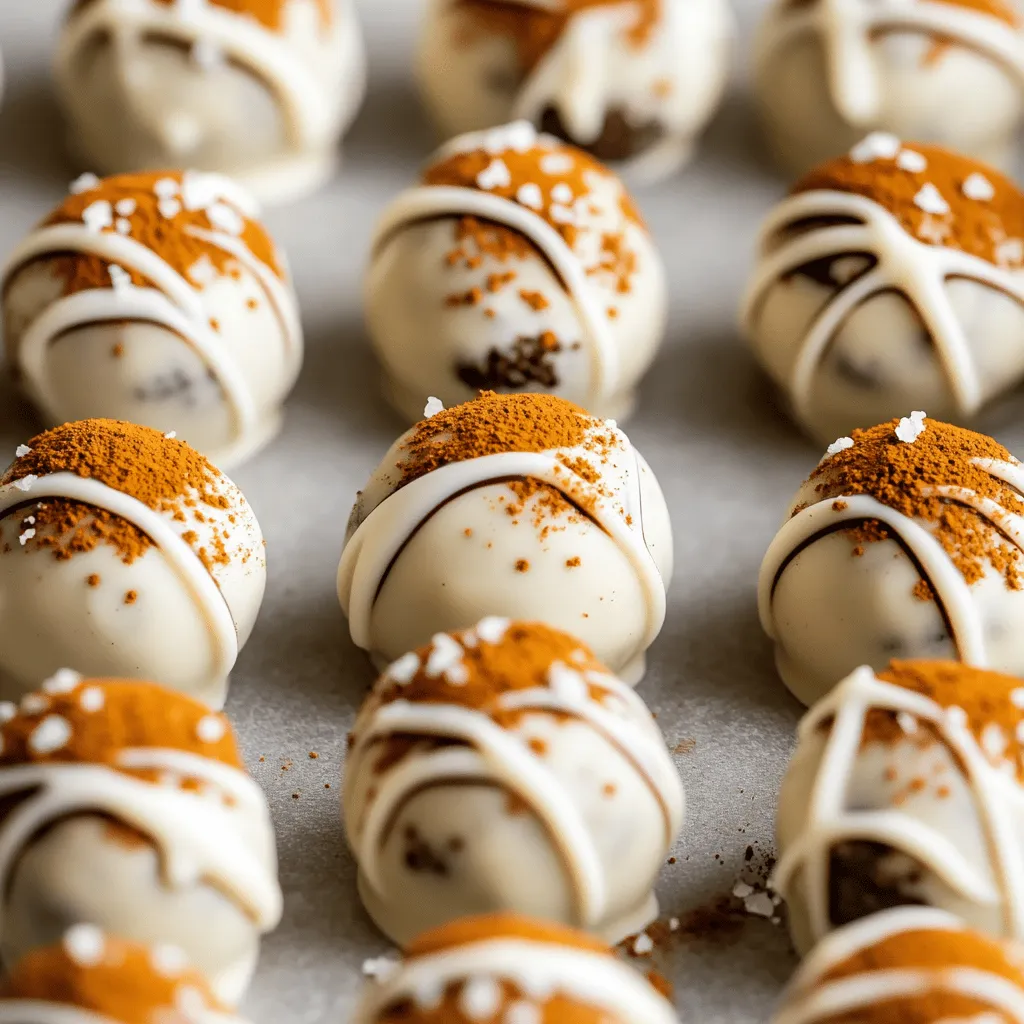
For an even coating, you can rotate the ball while it’s in the chocolate. Another technique is to use a toothpick: insert it into the top of the ball, dip it into the chocolate, and then use the toothpick to lift it out. This method allows you to have more control over the coating process. After dipping, place the coated balls back onto the parchment-lined baking sheet. Repeat this process until all the balls are coated. If desired, sprinkle crushed Oreos or orange sprinkles on top of the chocolate coating before it sets, giving the treats a festive appearance.
Garnishing
Garnishing your Pumpkin Oreo Balls not only enhances their visual appeal but can also add an extra layer of flavor. Timing is crucial here; you want to add your garnishes while the chocolate coating is still slightly wet. This ensures that the toppings adhere properly. Consider using crushed Oreos, orange zest, or even a drizzle of contrasting chocolate (such as dark chocolate over white chocolate) to create an eye-catching design.
For a fall-inspired touch, you might also think about using edible glitter or colored sugar. If you’re feeling adventurous, try adding a pinch of cinnamon or nutmeg on top of the chocolate for a seasonal twist. Once you’ve garnished the balls, allow them to sit at room temperature for a few minutes before moving on to the setting process.
Setting the Chocolate
Setting the chocolate is the final step before enjoying your Pumpkin Oreo Balls. You have two main options: letting the chocolate set at room temperature or speeding up the process by refrigerating the balls. If you choose to let them set at room temperature, keep them in a cool, dry place away from direct sunlight. This method usually takes about 30 minutes to an hour for the chocolate to harden completely.
If you’re short on time, placing the balls in the refrigerator is a great alternative. This method can reduce the setting time to around 15-20 minutes. However, avoid leaving them in the fridge for too long, as this can cause the chocolate to become dull or develop a white film, known as “bloom” from condensation. Once the chocolate is set, your Pumpkin Oreo Balls are ready to be enjoyed!
Nutritional Information
When enjoying Pumpkin Oreo Balls, it’s essential to consider their nutritional profile. Each ball contains approximately 100 calories, 5 grams of fat, and 12 grams of carbohydrates, depending on the specific ingredients used. They also provide a small amount of protein, primarily from the cream cheese and Oreos. While these treats are delightful, they should be enjoyed in moderation, especially if you’re mindful of your sugar intake.
Incorporating these treats into a balanced diet can be done by pairing them with healthier options, such as fresh fruit or nuts, or by serving smaller portions. They make for a great dessert option during the fall season, but be cautious not to overindulge, especially when serving them at gatherings where it’s easy to lose track of how many you’ve eaten.
Serving Suggestions
Pumpkin Oreo Balls are not only delicious but also visually appealing, making them a great choice for various occasions. For serving, consider arranging them on a decorative platter. You can create a festive display by surrounding them with seasonal decorations, such as small pumpkins or autumn leaves. This presentation is perfect for parties, potlucks, or holiday gatherings.
Pair these treats with beverages like coffee, hot chocolate, or even a spiced apple cider to complement their flavors. For a more sophisticated touch, serve them alongside a dessert wine or a rich stout beer. If you’re gifting these balls, consider packaging them in clear cellophane bags tied with a festive ribbon, or place them in decorative boxes with a few sprigs of fall foliage for an extra personal touch.
Seasonal Variations
One of the fantastic things about Pumpkin Oreo Balls is their versatility. While the pumpkin flavor is perfect for the fall, you can adapt this recipe for various seasons and occasions. For a classic taste, use regular Oreo cookies instead of pumpkin-flavored ones, and swap the pumpkin puree for cream cheese. This variation creates a traditional Oreo ball that is delicious year-round.
During the winter holidays, consider incorporating peppermint extract into the chocolate coating or using crushed peppermint candies as a garnish for a festive twist. In the spring, you might experiment with citrus flavors by adding a hint of orange or lemon zest to the mixture for a refreshing change. The possibilities are endless, allowing you to customize this recipe to suit any event.
Storage Tips
To ensure your Pumpkin Oreo Balls remain fresh and flavorful, proper storage is crucial. Store them in an airtight container to prevent moisture and odors from affecting their taste. If you plan to keep them for more than a few days, refrigeration is recommended. They can typically last for up to one week in the refrigerator.
For longer storage, consider freezing the balls. Place them in a single layer on a baking sheet until fully frozen, then transfer them to a freezer-safe container or bag. They can last for up to three months in the freezer. When you’re ready to enjoy them, simply thaw them in the refrigerator for a few hours before serving. This method allows you to prepare these delightful treats in advance and enjoy them whenever the craving strikes.
Conclusion
Pumpkin Oreo Balls are a delightful seasonal treat that perfectly combines the rich flavors of pumpkin and chocolate with the nostalgic taste of Oreos. Their simplicity in preparation makes them an accessible dessert for both novice and experienced bakers alike. Whether you’re serving them at a festive gathering, gifting them to friends and family, or simply enjoying them as a tasty indulgence, these treats are sure to impress.
Their versatility allows for creative variations, making them suitable for any occasion throughout the year. With proper storage, you can enjoy these treats long after the fall season has passed. We encourage you to gather your loved ones, roll up your sleeves, and dive into the fun of making and sharing these charming Pumpkin Oreo Balls. Happy baking!